12 Fish Passage Field Work Guide
12.1 Apps and Programs Used
Timestamp Camera is used to take photos (landscape only) in the field. Time and utm settings can be found in Zotero with the citation key
irvine2021FishPassage.Avenza Maps is key for loading georeferenced pdf field maps from https://hillcrestgeo.ca/outgoing/fishpassage/projects/. We also add
kmlfiles of our target sites (taken from safety plans) toAvenzato make navigation easy. The paid version is necessary to load many maps at the same time for big projects.Dropbox is used for bulk uploads to
Avenza.Garmin BaseCamp is used to move
gpxfiles in and out of our gps. We export tracks out ofBasemapwith the track names unchanged and we name thegpxfiles informatively (see screenshot below for example). Note: The gps units have a little $150 micro sd card behind the batteries that can come loose, this chip is key to knowing where we are going. Be careful when changing batteries.

12.2 Resources
Methods for the protocol for fish passage determination of closed bottom structures (phase 1 assessments). Note that we have a table that we can call from fpr (see the fpr repo for how to load the package from github) using fpr::xref_names_pscis that ties the column names from the whse_fish.pscis_assessment_svw to the janitor::clean_names version of the column names for PSCIS input excel template to the names we use in the tables of our reports (Ministry of Environment 2011).
Fish Collection Methods and Standards are relevant to review for electrofishing and minnowtrapping procedures (Resources Inventory Committee 1997).
Phase 2 assessments guideline doc (Fish Passage Technical Working Group 2011).
Methods we have been using to get standardized fish and fish habitat data while doing phase 2 assessments (Resource Inventory Standards Committee 2001).
Site card for fish and fish habitat (Ministry of Environment 2001).
Site card methods for fish and fish habitat inventory (Ministry of Environment 2008).
Field key to the freshwater fishes of BC (McPhail and Carveth 1993).
12.3 Methods
Fish Passage
We use the Provincial Methods for determining fish passage status. Other important things to note when collecting data include:
- When measuring channel width and stream gradient, take measurements upstream of crossing because this is the habitat that will be gained if remediation occurs. Take measurements outside of the road corridor, average of three widths and a slope in the longest possible section.
- If the crossing is a moti structure, record the
chris_culvert_idof the crossing. If it is a MAJOR structure, record thechris_hwy_structure_road_id - If the crossing does not have a PSCIS crossing ID, record the bcfishpass modelled crossing ID. If neither of these are present, assign a number using YYYYMMDD01 naming convention.
- Record crew members and circle the initials of the person who’s GPS was used to record the crossing location. This avoids confusion in the data management stage.
- For culvert crossings with multiple pipes installed at the same elevation at the outlet, add diameters together.
- Record key comments upon completion of the assessment. Information may include: confirmed fish presence on stream, habitat value and description, local knowledge, presence of potential natural barriers (ex: cascade or waterfall), and any other information that may be important to future remediation work. Look for information from past survey work and/or features on the map to gather information and get the big picture of what’s going on.
- If the crossing is an obvious barrier and the stream habitat appears high value, make a note that this location could be a high priority for follow up and a habitat confirmation.
Habitat Confirmations
We use the Ministry of Environment Methods. Other important things to note when collecting data include:
- Ensure at least three wetted and channel widths are taken.
- Record the UTM coordinates at the bottom of your site. Record site length by using your GPS to measure the distance between the start and end of survey.
- In the local name field, record the pscis or modelled crossing id followed by an underscore and ‘us’ or ‘ds’, indicating if the survey was done upstream or downstream of the crossing.
- Survey upstream of crossing for a minimum of 600m, and downstream a minimum of 300m.
- Take lots of photos using timestamp. Photograph features/obstacles if present, gravels, pools, any other photos of the stream that will help tell the story. Put a walking pole in your picture to help get an idea of the scale. Include your boot in gravel pictures for scale.
- Make sure to record comments on field card. Information like stream habitat, presence of natural barriers, fish sightings, presence of spawning gravels and deep pools should all be included in the comments if appropriate.
Fish Sampling
- When recording the location, use the site id (PSCIS ID or modelled ID) followed by ’_us’ or ’_ds’ and ’_ef#’ indicating if the site is upstream or downstream and what the site number is. Ex: 198216_us_ef1.
- Record the electrofisher settings, including the seconds elapsed during the survey.
- Record the length in mm
- Most fish that are over 60mm long also get a PIT tag. When recording tag #, only record the last 3 digits. Also record the tag row id every so often. See section below on PIT tagging.
- Take photos of fish using the timestamp app, and record the exact time of the photo on the site card. This will make it easier to identify fish later on. If unable to identify the species, it is important to take a photo and review field id guides later.
- Fill out a habitat card for every electrofishing site. At minimum, data should be recorded on the site length, time and location, water quality, stream channel width (at least 3), and habitat comments. Any other info on habitat quality can also be filled out.
PIT Tagging
We use the Abdominal Cavity method, outlined by Biomark.
- Ensure the needle is loaded with a tag before grabbing the fish. Be very careful when handling the needle. Change out needles after tagging around 10 fish, they will wear out and it will become more difficult to penetrate the skin, potentially causing injury to the fish.
- Do not wait too long to tag fish after capture. The shock from the electrofisher will wear off and the fish will become more active, making them more difficult to tag and increasing the risk of puncturing a vital organ.
- Do not insert the needle too deep, but ensure the tag is inserted parallel to the body of the fish, just underneath the skin.
- Upon tagging the fish, wave the tag reader over it and record the tag number on the field card.
12.4 Data Management in the Field
We gather large amounts of data in the field every year. It is important to manage this data by ensuring it is taken down correctly AND backed up appropriately. The following are important guidelines that we follow when in the field.
Photos
- Timestamp App should be used with current date and time (yyyy-mm-dd HH:MM (24hr clock)) and UTM coordinates only in top right corner. It is important to let the App “find” where you are before taking the first photos at a new site. It can take a few seconds for the app to zoom into the location where you are standing once it is opened. Closing the app every time you use it will help your phone battery not drain.
- Orient camera landscape when taking photos.
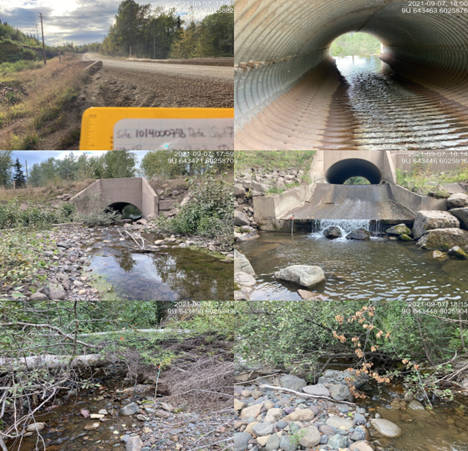
- The following are mandatory photos for all culvert, bridge and ford sites : road, barrel, outlet, upstream, downstream, inlet – (clockwise in figure below). Include the site name in the bottom left corner of each road photo (see example below) and take the photo of the road first (makes finding the sites easy when sorting in the office).
- Ensure the time and date are recorded on field cards. Please photograph all cards (in the order that the cards were filled) at the end of each workday as a data backup. Please submit all field cards to project manager at the end of each day (or the following morning if you are in different areas at the end of the day).
- All photos taken in the field should be backed up. Please don’t filter out any photos unless they contain completely irrelevant personal photos taken outside of working hours.
- Please keep a version of original photos on your computer (and your phone if possible as a backup (I even pay for 50gb of icloud photo storage - $2/month - to have a third layer of protection). When copying originals to the hardrive please place originals all in one file under photos/your_name/originals).
- Please resize (make a copy) of all photos. Ideal size with resizer is “large” or 1920 X 1080 pixels and all resized photos must be under 1MB. You can adjust settings in Timestamp App to resize. If the file is still too large, change setting to 1440 X 1080 pixels
- Place all the resized photos for each crossing into folders according to the name of the crossing as recorded on the card (only one folder per crossing). This includes upstream and downstream survey photos as well as electrofishing and minnowtrap photos. Rename the following photos only by appending the word to the end of the original filename with an underscore (i.e. “_”). upstream, downstream, inlet, outlet, barrel, road (ex. photos/your_name/resized/123456/IMG_2133_upstream.jpeg). Copying and pasting the words from a .txt or similar file can reduce typos which cause errors on submission.
- Adjust settings for metadata of photos to include time taken and location to sort photos to sites and programmatically match photos to gps tracks so we know where it was taken.
GPS
- Please record GPS data on all field cards and circle the initials of the surveyor whose track is referenced for the work. This is important for cross referencing data and location.
- Please run track on GPS during all field work at all times. Track is time based with 10 second interval).
- Download “Current Track: date_stamp” each day or two but please do not save different tracks on the GPS unit itself. The output data is easiest to deal with if it is as few tracks as possible. The GPS will wrap tracks once and a while according to size (ex. 2021-07-27 15:59:35 Auto) and these should be saved along with the “Current Track. Please confirm that everything is backed up by looking at where you have been in Garmin Basecamp (freeware).
12.5 Field Work Operations
Before heading out make sure to:
Check road closure information at https://www2.gov.bc.ca/gov/content/industry/natural-resource-use/resource-roads/local-road-safety-information.
View the road activity status in the forest tenure layer (QGIS and Mergin).
12.6 Equipment
Equipment can be signed out by placing an x in the column corresponding to your name in the equipment page of the data/equipment_contacts_safetylog.xlsx spreadsheet. When returned the x can be removed and the below tables will update on gitpages build.
readxl::read_excel(
             path = "data/equipment_contacts_safetylog.xlsx",
             sheet = 'equipment',
             .name_repair = janitor::make_clean_names) %>%
  dplyr::filter(!is.na(mateo_winterschedt)) %>%
  dplyr::select(Equipment = eq_item) %>%
fpr::fpr_kable(caption_text = 'Equipment signed out by Mateo.')| Equipment |
|---|
| clinometer |
| field vest |
| GPS |
| Bear Spray |
| Waders |
| Boots |
| radio truck |