6 R and Rstudio
6.1 Rstudio settings
It’s important for the team to all have the same settings in Rstudio. This will make it easier to help each other out and troubleshoot problems. Some settings can be personalized (ie, editor_theme), but others should be consistent across the team.
Tools/global options/general/basicsettings should be the same as the image below. It’s very important to have “Save workspace to .RData on exit” set to Never, and deselect “Restore .RData into workspace at startup”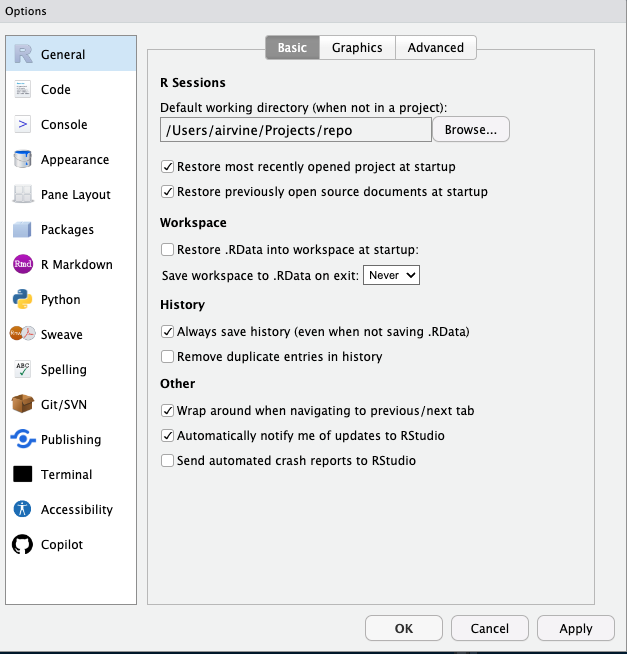
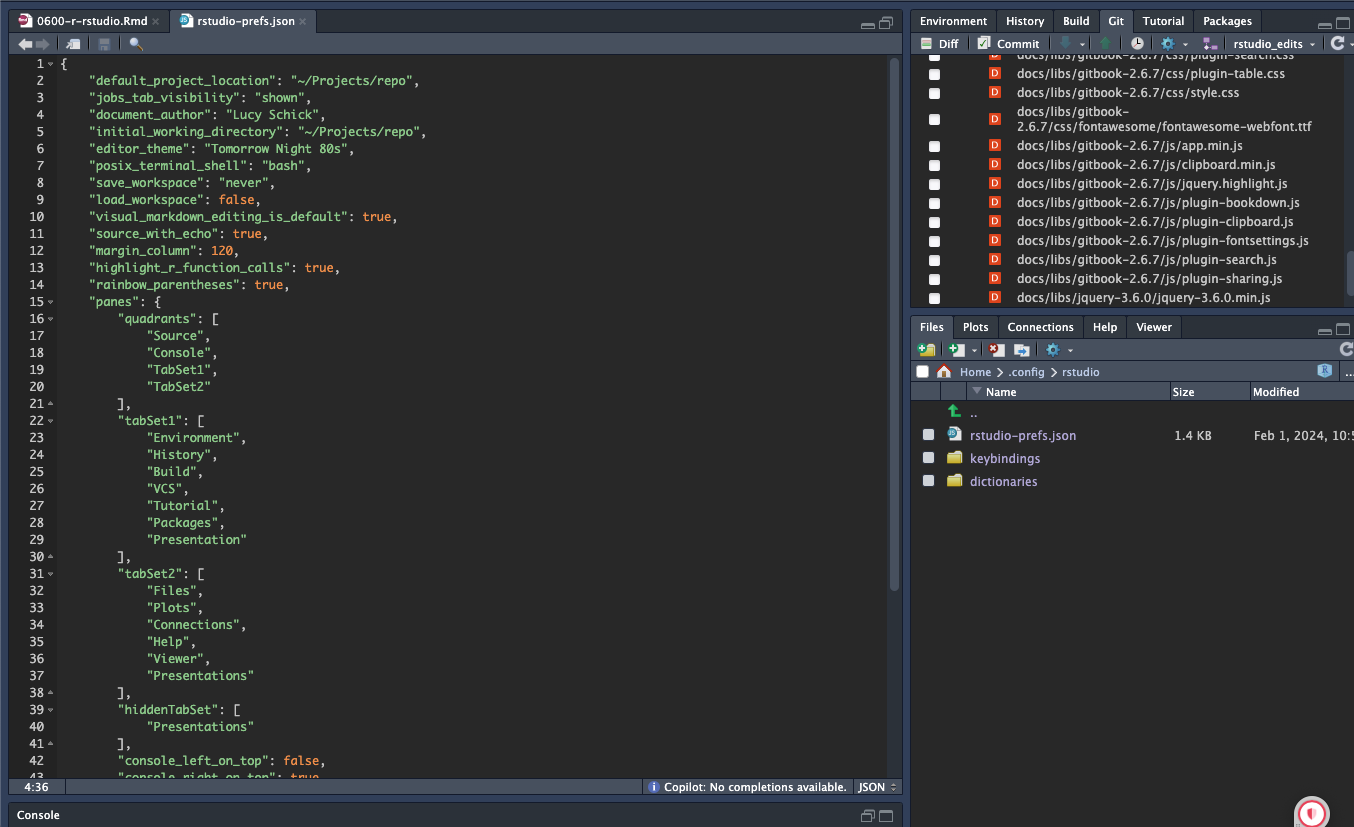
Another way we maintain the same settings is by all having the same settings in
rstudio-prefs.json. You can find this file inHome/.config/rstudio/rstudio-prefs.json, useCmd+shift+.to see your dotfiles. Replace your currentrstudio-prefs.jsonwith the one found in our dotfiles repo. This will give you the same settings as the rest of the team. Make sure to change the"document_author":to your name, and feel free to change the"editor_theme":to your preference.
6.2 Packages
Use pak to install packages when possible.
To get info about any function or package:
- To see all functions in the package, run
ls("package:package_name"). - To pull up the documentation for a specific function, run
?function_name. - To see the raw function code in the console, run
function_name
- To see all functions in the package, run
Here are some packages to become familiar with:
Introduction to Writing Packages in R
6.3 Helpful Resources
R for Data Science - A helpful resource for learning how to get your data into R, organize it, transform it, visualize it, and model it.
wtf is a good resource for learning more about R/Rstudio.
6.4 Rstudio Keyboard Shortcuts
A list of some of the most common R studio keyboard shortcuts for Mac. Once you get used to these it will make script writing much quicker.
- Commenting and uncommenting code:
Ctrl + Shift + C - Pull up shortcuts cheat sheet in R:
Alt + Shift + K - Insert pipe operator:
Ctrl + Shift + M - Insert assignment operator:
Alt + - - Make source pane full screen:
Ctrl + Shift + 1 - Make console pane full screen:
Ctrl + Shift + 2, 3 doeshelppane, 4 doesenvironmentpane. - Cursor-select multiple lines:
Ctrl + Alt + Up/Down/Click - Find in files:
Ctrl + Shift + F - Refresh R:
Ctrl + Shift + F10 - List recent commands:
Ctrl + ↑ - Execute command on currently selected line:
Ctrl + Enter - Execute complete script:
Ctrl + Shift + S
- Commenting and uncommenting code:
We have also created some of own shortcuts that are specific to our workspace. Here are a few examples:
- Completely restart Rstudio (not just R) so you can do things like reload
shrtcts:Shift+Cmd+9 - Open Chattr Background Job:
Ctrl+C+B
- Completely restart Rstudio (not just R) so you can do things like reload
You can find these shortcuts in the
.shrtcts.Rfile in our dotfiles repo. To use these shortcuts:- Install the
shrtctspackage by runningpak::pkg_install("gadenbuie/shrtcts"). - Save the
.shrtcts.Rfile in your home directory - Add the following code to your
.Rprofilefile (also located in your home directory):
- Install the
if (interactive() && requireNamespace("shrtcts", quietly = TRUE)) {
  shrtcts::add_rstudio_shortcuts(set_keyboard_shortcuts = TRUE)
}- More info on this can be found in the shrtcts github. Worth noting that weird glitches happen when there are conflicting shortcuts to the same call (
.shrtcts.Rvs manually added shortcuts inTools/Modify Keyboard Shortcutsin Rstudio).
6.5 Rmarkdown
Rmarkdownis a great way to write reports, papers, and presentations. It allows you to write text and code in the same document. You can also create tables, figures, and equations. The document you are reading right now is in fact an.rmd(Rmarkdown) file! Checkout the Rmarkdown cheatsheet for a quick reference guide.- Take a look at the Remedy package for some nice
Rmarkdownshortcuts. - You can use rsam to then manage
addinssuch asRemedyand others.
- Take a look at the Remedy package for some nice
Cross-referencing in Rmarkdown is really useful for referencing figures, tables, and sections. This can be done multiple ways using the
bookdownpackage. Check out how to cross-reference here, specifically the pandoc auto-naming conventions if you are going to reference using header identifiers. Some examples of cross referencing are below:- To reference a figure:
Figure \@ref(fig:label) - To reference a table:
Table \@ref(tab:label) - To reference a section:
Section \@ref(label) - To reference a section:
[heading name] - Example:
Section \@ref(git-and-github)makes Section 5 - Example:
[Git and Github]makes Git and Github
- To reference a figure:
Super important to not use
_in your chunk labels, as it will not reference properly. Use-instead.
6.6 Dataframes
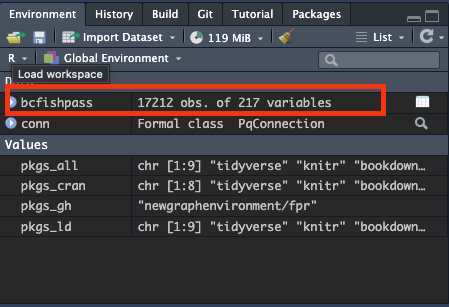
- You can get lots of info about the structure of a dataframe just by looking at the details in the
environmentpane. For example,# of obs= number of rows,# variables= number of columns
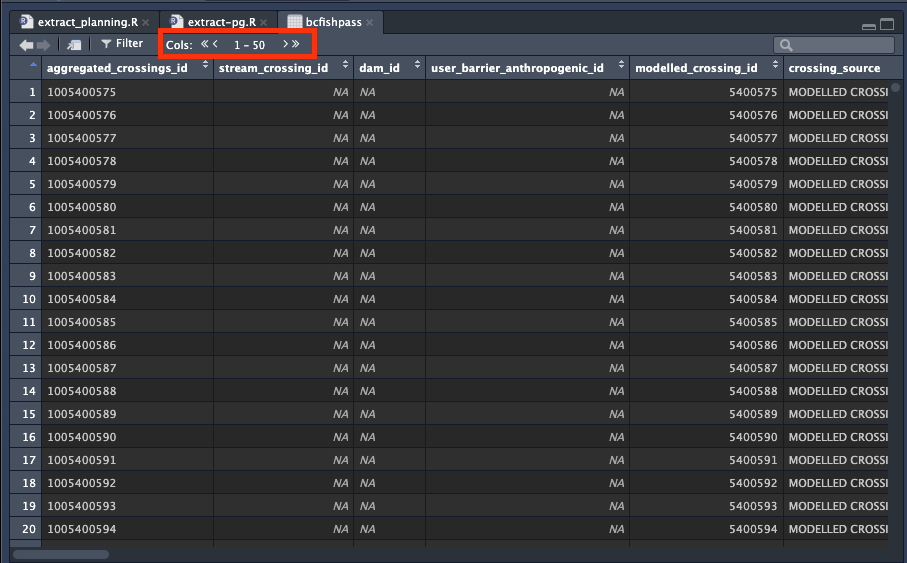
- When dataframes or tables have many columns (more than 50) Rstudio will only show you 50 at a time, so to see the rest you need to use the arrows located on the top left of the df/table view.
- Hovering your mouse over the df will tell you what class the object is, in this example bcfishpass is of class sf (simple feature)

- You can also check the class using:
class(bcfishpass)- You can glimpse the columns using
str(bcfishpass)or
head(bcfishpass)- You can use the waldo package to compare columns
waldo::compare(bcfishpass$aggregated_crossings_id, bcfishpass$stream_crossing_id)gives:
old is a character vector ('1005400575', '1005400576', '1005400577', '1005400578', '1005400579', ...)
new is an integer vector (NA, NA, NA, NA, NA, ...)
6.7 Writing functions
Turning scripts into function for workflows that we use often can be very helpful for reproducibility and efficiency. Please read through writing good functions before moving on. Here are some additional things to remember when writing functions:
- Add roxygen2 doccumentation to your function.
- Name the function with a
t(test) prefix to indicate that the function is for still in the testing phase, until it gets pulled intofpr. For exampletfpr_db_query(). - Call functions explicitly using
::, for exampledplyr::mutate()and make sure all functions are included using the@importFromsyntax. - Include safety checks. You can use chk.
- Define default values for parameters, even if they are =
NULL. - Keep pipes simple by calling functions once and using
,to separate variables. For example, put allcase_when()calls in onemutate()call instead of multiple. - If certain numbers are being repeated in the function, consider defining them as params at the top of the function.
- Avoid using
getwd()because for most of our projects the working directory in a project is the main directory of the project. - Avoid using
data.tablefunctions, and instead usestringr.
Here are the steps for testing your function once it is written:
- add your script as an R file in
Rdirectory.
- run
devtools::document().
- run the
devtools::check()orcheckfrom the build window, see 6.1. You need to have no errors to proceed. - run
Testin that same window. Tests must pass to proceed. - add a bit of detail to
news.mdin main directory - run
Install/Clean and Install, see 6.1. - Restart R in a repo outside of
fpr. Load withlibrary- Test it.
- add your script as an R file in
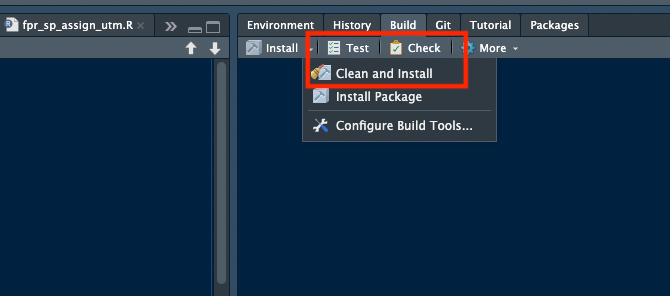
Figure 6.1: Using the devtools::check function